To set up lock control on the local IP network, you will need to get the following from the Tedee lock application or website:
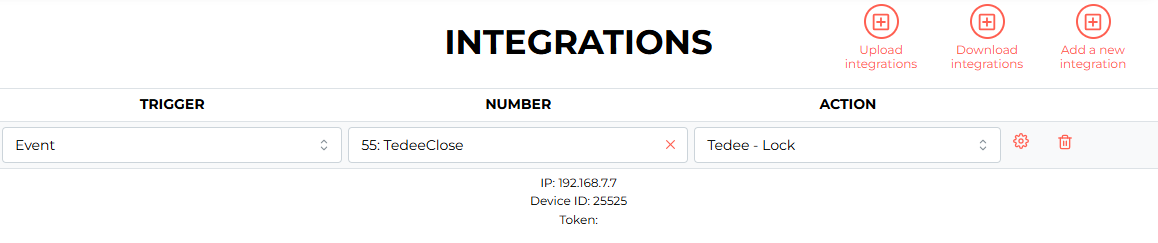
In the Ampio Designer tool, select the SETTINGS tab and the INTEGRATIONS sub-tab. Then, from the right-hand side of the screen, select Add new integration. In the ACTION field, select the appropriate task, the choices are:
 Click to enlarge and open in a new tab.
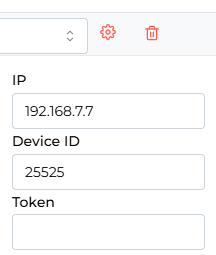
For the selected action, select an event in the Ampio system or add a new one and give it a name. Then select the cog icon on the right and enter the lock’s IP address, ID and Token.
 Click to enlarge and open in a new tab.
This type of event can be triggered, for example, with logic from a binary flag.
 Click to enlarge and open in a new tab.
When the trigger is invoked, for example, from a mobile app or touch panel, the lock will close according to the command.
The access key is generated in the Tedee portal by navigating to Personal access keys. Link to Tedee technical documentation: https://tedee-tedee-api-doc.readthedocs-hosted.com/en/latest/howtos/authenticate.html.
The authorisation method used here requires providing the tedee cloud login and password details in block parameters – we use the data according to the method described in an official manufacturer’s documentation. Everything that is in the block is visible – anyone can see what the script does with the data. The password, however, is hidden by Node-RED and access to Node-RED itself is also protected on MSERVs. In our opinion, the integration is safe, but if you want to be extra cautious, we recommend that you set up a very strong password to MSERV and SmartHome Manager – this is the very basic thing that needs to be done.
Add 2 objects (sensor type) in SHM – one will indicate the lock’s status and the other its battery life. Save their ID. Then, add 2 regular flags to SHM (add an object, select the module from the list on your left to which you want to assign the flags, and enter the number of the flag in that module in the “Number” column) – they can be assigned to any module, but MSERV is preferred. They will be used as initiators of action “Open” and “Close”. You have to remember which flags are they and in which module they are (it is advisable to describe them well in the configurator), so that you do not use them for anything else. Set the initiation time to ‘100’, so that the flag works as a button and only sends impulses.
Note: In the nearest future this setup will be updated and a line flag will be added to MSERV. One additional functionality must, however, still be added to the application.
 Click to enlarge and open in a new tab.
Optionally, one can also add a related object to sort out all the values in one field.
In the new CAN configurator M-SERV-s will show 3 line flags available. Mark one of them (give it a unique name), so that you do not use it unconsciously somewhere else. The line flag will store the lock’s status in a numerical form, as per the table below (from the manufacturer’s official documentation):
| Number | Name |
|---|---|
| 1 | Uncalibrated |
| 2 | Calibrating |
| 3 | Unlocked |
| 4 | SemiLocked |
| 5 | Unlocking |
| 6 | Locking |
| 7 | Pulled |
| 8 | Pulling |
| 9 | Unknown |
| 18 | Updating |
We can later also add a condition to such a line flag and, e.g. switch the lights on, illuminate a touch panel in green, red, or otherwise, etc.
The next integration step happens in Node-RED. Open Node-RED with the following address: http://ADRES_IP_MSERV:1880. Basic familiarity with Node-RED is advisable.
Use the top right button “Import” to import the tedee.json file. You will get the following block:
 Click to enlarge and open in a new tab.
Enter the following parameters in the block:
 Click to enlarge and open in a new tab.
Enter your tedee account’s login and password. Then open your lock in the tedee application and look for a gear icon at the bottom of the screen. Open the “Information” tab and copy the lock’s ID into the block’s parameters in Node-RED.
In the “SHM State object ID” field, enter the object that you created in the SmartHome Manager to store the status of the lock.
In the “SHM Battery level object ID” field, enter the object that you created in the SmartHome Manager to store the status of the battery life.
In the “Linear flag ID” field, select the line flag’s number that you will use.
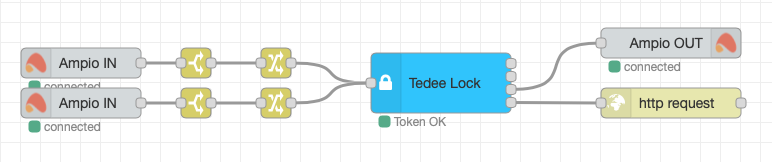
Now, connect the block:
 Click to enlarge and open in a new tab.
The block will expect the msg.payload string ‘open’ or ‘close’ at the input. This is why two Ampio IN blocks need to be attached – one for the ‘open’ flag, and the other for a ‘close’ flag. Then, attach the switch and change blocks. Switch verifies if msg.payload equals 1, while change sets the right ‘open’ or ‘close’ string.
For those who do not feel comfortable with this integration step, we recommend reading an example included in the tedee_example.json file to see how it should be done.
At the block’s output we see 4 ‘dots’ that indicate 4 nodes. The first communicates a status in a numerical form. The second one is for the battery life. The third node sends a RAW command to set the line flag up, while the fourth one sends an HTTP request to API.
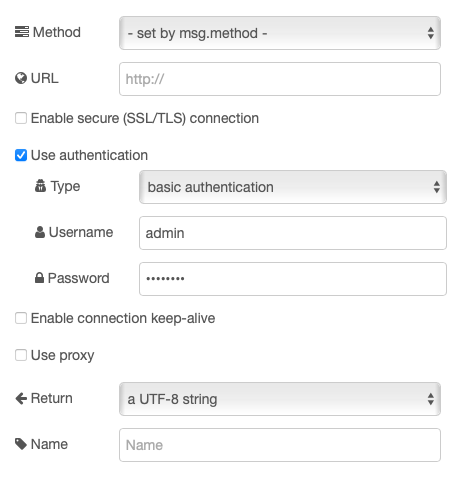
In order to carry out the integration, nodes number 3 and 4 need to be connected. Connect the “Ampio OUT” block to the 3rd node and select MSERV (or a different module that you set up with a line flag in step 2 “Line flag” of this guide) as well as the output type – RAW CAN broadcast. Then, connect the “HTTP request” block to the 4th node and configure as shown below:
 Click to enlarge and open in a new tab.
Enter your SmartHome Managera details as username and password.
Having assigned objects in SHM to a group, open the mobile application (Ampio UNI) and test the integration. It should look more or less like this:
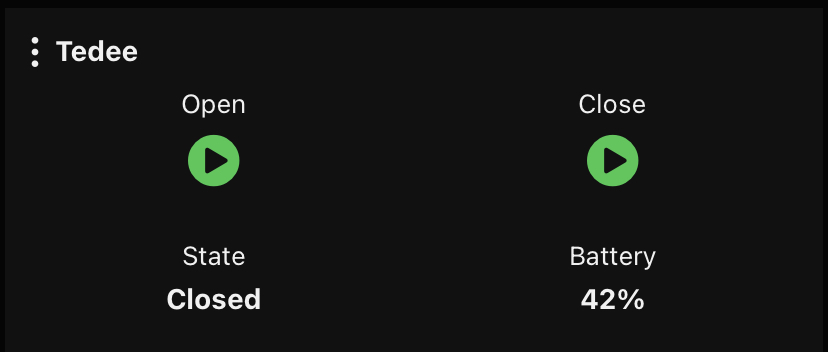 Click to enlarge and open in a new tab.
Updating the status and battery life can take a while – an update happens every 10 seconds. When you press the “open” or “close” buttons, the lock should perform those actions and update its status. When the open/close action is initiated with Ampio, the lock will keep updating every second for the next 10 seconds in order to report its status accurately. After that, it will start updating every 10 seconds again.
The latest Tedee library version might not support the above-mentioned approach to displaying the battery status. In such a situation, you should download the status from the Tedee Lock block’s second output and display the status in the mobile app with a line flag. You may find the guide Integration of the Ampio system with Node-RED useful here.
If you want to, you can control the lock from a panel or any Ampio module with inputs. In order to do that, you have to create a condition of reassigning the input status to the flag that controls opening and closing of the lock. Additionally, you can also create conditions to the lock’s status by creating a condition in the line flag. For example, if the flag’s value equals 2, it means that the lock is open and you can initiate another action based on that.
Downloads:
Tedee locks can also be integrated by purchasing the Tedee Dry Contact wired module. For more information, please visit the manufacturer’s website.