In this guide, you will find out how to establish the first connection with your building automation installation with the use of the Ampio UNI mobile application.
The first step, naturally, is downloading the Ampio UNI mobile application to your mobile device. The application is available for both, devices with Android operating system, and with iOS, and can be downloaded from Google Play and App Store.
Apple and Apple logo are trademarks of Apple Inc., registered in the U.S. and other countries. Google Play and the Google Play logo are trademarks of Google LLC.
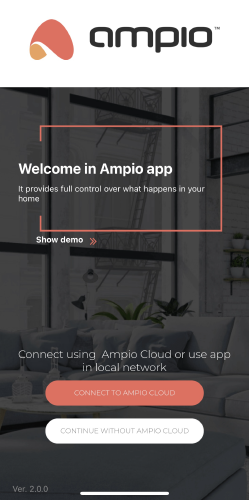
At the first application launch, it is possible to log into the Ampio Cloud account, or to continue only in a local network.
 Click to enlarge and open in a new tab.
If you decide to use the local network, you will still be able to log into the Ampio Cloud at a later stage.
An installer who establishes and configures the building automation installation has the ability to assign installation owner permissions. This is achieved by sending an invitation to access the installation. In order to accept such an invitation, you should log into the Ampio Cloud in a browser - a relevant notification allowing you to accept or deny such an invitation will be visible right after logging in.
After accepting the invitation, the installation will be available for selection on the installation list in the Ampio UNI application. You should bear in mind that the installation will only appear on the list if the invited user is also logged into the Ampio Cloud in the mobile app.
You should provide your local login and password to the installation at the first login. The information will be saved in the mobile application.
During implementation works, an installer is allowed to access the installation remotely and to grant access to it to other users. These permissions are connected to the installer’s association of his/her Ampio Cloud account with a given installation, and they are in effect until the installation is deemed completed. More information on this subject can be found in the article about Ampio Cloud installation statuses and the article about installer’s remote access rights.
It is also possible to gain access to an installation without installer’s involvement. In order to do that, you have to connect via Wi-Fi with your mobile device to a local network, in which an M-SERV family device of the building automation installation is available. Then, after opening the app you can add a new installation to the My installations list by clicking on the plus sign located in the top right corner of the screen. Next step is to provide a local login and password to the installation, its name and IP address of the M-SERV device.
The easiest way to find out what is the M-SERV’s IP address is using the search for server option available at the bottom of the screen when adding an installation in the mobile app. Other methods of determining the IP address can be found in the documentation of specific M-SERV family devices.
Once the installation profile is created, it is possible to connect to the installation by selecting it on my installations list. On the first login attempt, there will be a notification asking whether you want to link the installation to your Ampio Cloud account. After granting consent, you will be redirected to a form used for creating associations. Having completed the form, you will be able to obtain remote access to an installation via the Ampio Cloud and you will be registered as the installation owner.
The first user that created an association with his/her Ampio Cloud account is automatically considered the building automation installation’s owner. That user can then manage the access rights to the installation of other Ampio Cloud users.
In the case when the request for connecting an installation to an Ampio Cloud account gets denied, the process can be initiated manually in the Ampio UNI app in Ampio logo > Security > Add server to cloud after connecting to the installation within a local network.